Prerequisites
- Better to be familiar with developing web applications with J2EE/Servlets Basic
- knowledge on using Eclipse IDE
System Requirements
- Java EE 5 is installed
- GWT 1.7 is installed
- GWT Designer 7.1 plug-in for eclipse is installed
In brief, GWT is a framework for developing Ajax based web pages with Java. All the HTML page content will be written as Java classes and converted into a set of JavaScript files.
GWT-Ext is a powerful widget library that provides rich widgets like Grid with sort, paging and filtering, Tree's with Drag & Drop support, highly customizable Combo Boxes, Tab Panels, Menus & Toolbars, Dialogs, Forms and a lot more right out of the box with a powerful and easy to use API.
GWT Designer (from Instantiations) is the kind of tool that will encourage greater adoption of GWT and reinforce Java as a viable programming model for creating Ajax applications that work in all browsers.
Introduction
In this tutorial we will create a simple web application which has one page. When a user clicks a button, web page content will be updated without refreshing or leaving the current page. But the web page will talk to a servlet deployed in web server and update the page content. The communication between web server and browser will be invisible to the user, providing a convenient web experience. Even though this is a simple application, it represents a main concept of any advanced application implemented with GWT.
Implementation
The development work is broken down into 5 steps:
1. Setting up GWT java project
To start with, we need to create a GWT java project, choose File>New>Project. Under categories select GWT Java Project and click next.

In Project name, enter MyGwtApp and click Next.
 Select Create GWT module and leave module name and package name as default or you can enter the other name you like and click finish.
Once project is created, the project’s structure, GWT module and Entry point class is generated for you all, you don’t need to do anything else and it’s ready for you to deploy and test at once. You will see the project’s tree structure as below:

2. Adding GWT-Ext library to the project
To get it done, right click on entry point class, choose Google Web Toolkit>Configure for using GWT-Ext.

3. Creating service
For our application we need a service that provides data for our client side page. So we'll define this service to have only one method returning a String. This service will be provided through a servlet which is running on a server side.
To use a service in GWT project, we have to create the following java classes:
a.) Service definition interface
A service definition interface acts as a contract between the client and the server. It defines the functionality that is to be provided by the service, and lays down the ground rules for clients wanting to consume the functionality provided by this service.
b.) Asynchronous service definition interface
This interface is used to define the asynchronous version of the service. That is when ever a call is made to this interface, the caller can expect the service to be asynchronous and the result will be available after sometime.
c.) Service implementation
This is a class where we will implement the methods we defined in service definition interface. It’s the service servlet which does the actual work on server side.
Creating a service is very simple by using GWT Designer tool. Right click on project’s root, then choose Google Web Toolkit>GWT remote service. Browse for package and enter a name and click finish.

Now you can define a method to return a string as below:
package com.mycompany.project.client;
import com.google.gwt.core.client.GWT;
import com.google.gwt.user.client.rpc.RemoteService;
import com.google.gwt.user.client.rpc.RemoteServiceRelativePath;
@RemoteServiceRelativePath("HelloWorldService")
public interface HelloWorldService extends RemoteService {
/**
* Utility class for simplifying access to the instance of async service.
*/
public static class Util {
private static HelloWorldServiceAsync instance;
public static HelloWorldServiceAsync getInstance(){
if (instance == null) {
instance = GWT.create(HelloWorldService.class);
}
return instance;
}
}
public String getHelloWorld();
}
And then implement the method to return whatever string value you want on server side:
import com.mycompany.project.client.HelloWorldService;
import com.google.gwt.user.server.rpc.RemoteServiceServlet;
public class HelloWorldServiceImpl extends RemoteServiceServlet implements
HelloWorldService {
public String getHelloWorld() {
// TODO Auto-generated method stub
return "Hello World!";
}
}
4. Creating a window
Now we will create a window to display data string returning from server by clicking on the button
To create a window, right click on package com.mycompany.project.client, then choose New>Other. Under categories, select GWT-Ext Window and click next.
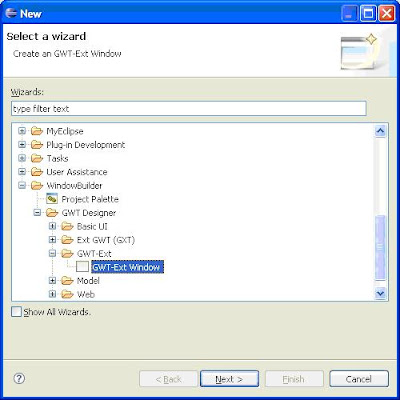
In Name, enter HelloWorld and click finish.

You can now add a button to window by writing code or using design mode

Add OnClick event of the button and write the code to call the service we just defined above:
import com.google.gwt.user.client.rpc.AsyncCallback;
import com.gwtext.client.widgets.Window;
import com.gwtext.client.widgets.Button;
import com.gwtext.client.widgets.event.ButtonListenerAdapter;
import com.gwtext.client.core.EventObject;
public class HelloWorld extends Window {
public HelloWorld() {
super("New window");
setSize("350px", "200px");
{
Button btnClckMe = new Button("Clck Me");
btnClckMe.addListener(new ButtonListenerAdapter() {
@Override
public void onClick(Button button, EventObject e) {
AsyncCallback callback = new AsyncCallback(){
public void onSuccess(Object result){
com.google.gwt.user.client.Window.alert(result.toString());
}
public void onFailure(Throwable caught){
}
};
HelloWorldService.Util.getInstance().getHelloWorld(callback);
}
});
add(btnClckMe);
}
}
}
Finally we need to modify entry point class in order to create instance of the window on module load.
import com.google.gwt.core.client.EntryPoint;
import com.google.gwt.event.dom.client.ClickEvent;
import com.google.gwt.event.dom.client.ClickHandler;
import com.google.gwt.user.client.Window;
import com.google.gwt.user.client.ui.Button;
import com.google.gwt.user.client.ui.RootPanel;
/**
* Entry point classes define
onModuleLoad().*/
public class ImageViewer implements EntryPoint {
private Button clickMeButton;
private HelloWorld window;
public void onModuleLoad() {
RootPanel rootPanel = RootPanel.get();
window = new HelloWorld();
clickMeButton = new Button();
rootPanel.add(clickMeButton);
clickMeButton.setText("Click me!");
clickMeButton.addClickHandler(new ClickHandler(){
public void onClick(ClickEvent event) {
window.show();
}
});
}
}
5. Compile and deploy
We have created all the required classes and files. Now we must compile and deploy the project. The project compiling is required to generate java classes to JavaScript.
To compile the project, right click on Entry point class, then choose Run As>Compile GWT Application.
To deploy the project, right click on Entry point class, then choose Google Web Toolkit>Deploy mode. On deployment screen, browse for server path to copy WAR file and click ok.

That’s it, we can now startup the web server (for this we use apache tomcat) and get our simple application running on the browser by the following link:
http:/localhost:8089/ImageViewer

0 comments:
Post a Comment