Wednesday, December 2, 2009

FileUpload with GWT-Ext and java EE servlet

This simple web application will demonstrate how to upload an image file by using GWT-Ext (on client side) and java EE servlet instead of GWT remote service (on server side). This web application allows user to browse for an image file and submit it to the apache tomcat web server, the request will be processed by a servlet deployed on the web server, it will extract the request for binary data and save it into the specified directory on the deployment location of web application. Once the image file is registered successfully it will be shown up on the current page.

To get start, we need to create a web application project, you can follow my previous post
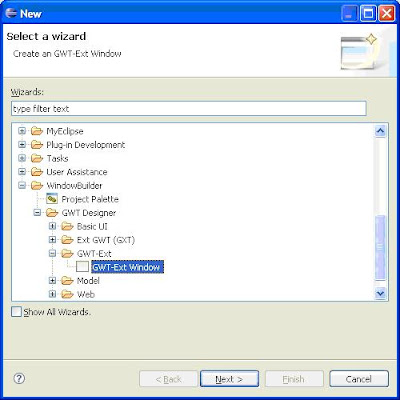
Using WindowBuilder for Google Web Toolkit & GWT-EXT, Once project is setup, we need a window to interact with the user, which looks like:

You can create a window by using the following code:

package com.mycompany.project.client;

import com.google.gwt.core.client.GWT;
import com.gwtext.client.core.Connection;
import com.gwtext.client.core.EventObject;
import com.gwtext.client.data.FieldDef;
import com.gwtext.client.data.RecordDef;
import com.gwtext.client.data.StringFieldDef;
import com.gwtext.client.data.XmlReader;
import com.gwtext.client.widgets.Button;
import com.gwtext.client.widgets.MessageBox;
import com.gwtext.client.widgets.Window;
import com.gwtext.client.widgets.event.ButtonListenerAdapter;
import com.gwtext.client.widgets.form.Form;
import com.gwtext.client.widgets.form.FormPanel;
import com.gwtext.client.widgets.form.TextField;
import com.gwtext.client.widgets.form.event.FormListenerAdapter;
import com.google.gwt.user.client.ui.Grid;
import com.google.gwt.user.client.ui.Image;

public class FileUploadWindow extends Window {
FormPanel formPanel = new FormPanel();
Grid grid = new Grid(1,1);
public FileUploadWindow() {
super("Photo Upload");
setSize("500px", "400px");
formPanel.setFileUpload(true);
//setup error reader to process from submit response from server
RecordDef errorRecordDef = new RecordDef(new FieldDef[]{
new StringFieldDef("id"),
new StringFieldDef("msg")
});
XmlReader errorReader = new XmlReader("field", errorRecordDef);
errorReader.setSuccess("@success");
formPanel.setErrorReader(errorReader);

final TextField textField = new TextField("Photo", "file");
textField.setInputType("file");
textField.setSize("334px", "28px");
formPanel.add(textField);
this.add(formPanel);
this.addButton(new Button("Submit",new ButtonListenerAdapter() {
public void onClick(Button button, EventObject e) {
MessageBox.confirm("Confirm", "Do you want to submit?",
new MessageBox.ConfirmCallback() {
public void execute(String btnID) {
if (btnID.equals("yes")) {
formPanel.getForm().submit(GWT.getModuleBaseURL()+"upload", null, Connection.POST, "Saving Data...", false);
}
}
});
}
}));
formPanel.addFormListener(new FormListenerAdapter(){
public boolean doBeforeAction(Form form) {return true;}
public void onActionComplete(Form form, int httpStatus, java.lang.String responseText){
Image image = new Image("images/"+responseText);
image.setSize("300px", "300px");
grid.setWidget(0, 0, image);
}
public void onActionFailed(Form form, int httpStatus, java.lang.String responseText){
com.google.gwt.user.client.Window.alert("File upload is failed.");
}
});
this.add(grid);
}

}

Next step, create a servlet as code below:

package com.mycompany.project.servlet;

import java.io.File;
import java.io.IOException;
import java.util.Iterator;
import java.util.List;

import javax.servlet.ServletException;
import javax.servlet.http.HttpServlet;
import javax.servlet.http.HttpServletRequest;
import javax.servlet.http.HttpServletResponse;

import org.apache.commons.fileupload.FileItem;
import org.apache.commons.fileupload.FileItemFactory;
import org.apache.commons.fileupload.FileUploadException;
import org.apache.commons.fileupload.disk.DiskFileItemFactory;
import org.apache.commons.fileupload.servlet.ServletFileUpload;
import org.apache.commons.io.FilenameUtils;

public class FileUploadServlet extends HttpServlet {
protected void doPost(HttpServletRequest request, HttpServletResponse response)
throws ServletException, IOException {
String rootDirectory = "C:/apache-tomcat-6.0.18/webapps/ImageViewer/";
boolean isMultipart = ServletFileUpload.isMultipartContent(request);
if (isMultipart) {
FileItemFactory factory = new DiskFileItemFactory();
ServletFileUpload upload = new ServletFileUpload(factory);
try {
List items = upload.parseRequest(request);
Iterator iter = items.iterator();
while (iter.hasNext()) {
FileItem item = (FileItem) iter.next();
if (item.isFormField()) {
} else {
String fileName = item.getName();
if (fileName != null && !fileName.equals("")) {
fileName = FilenameUtils.getName(fileName);
File uploadedFile = new File(rootDirectory+"images/"+fileName);
try {
item.write(uploadedFile);
response.getWriter().write(fileName);
} catch (Exception e) {
e.printStackTrace();
}
}
}
}
} catch (FileUploadException e) {
e.printStackTrace();
}
}
}
}

For this step you need to add commons-fileupload-1.2.1.jar and commons-io-1.4.jar to the project build path, and add the following code into web.xml:


<servlet>
<servlet-name>upload</servlet-name>
<servlet-class>com.mycompany.project.servlet.FileUploadServlet</servlet-class>
</servlet>
<servlet-mapping>
<servlet-name>upload</servlet-name>
<url-pattern>/com.mycompany.project.ImageViewer/upload</url-pattern>
</servlet-mapping>

I advise you to create a folder name “images” in the root directory (war) to store uploaded files and don’t forget to update entry point class as follow:

public class ImageViewer implements EntryPoint {

public void onModuleLoad() {
RootPanel rootPanel = RootPanel.get();
Button clickMeButton = new Button();
rootPanel.add(clickMeButton);
clickMeButton.setText("Click me!");
clickMeButton.addClickHandler(new ClickHandler(){
public void onClick(ClickEvent event) {
FileUploadWindow window = new FileUploadWindow();
window.setVisible(true);
}
});
}
}

Finally compile the project, deploy it to apache tomcat server and have it a test, if there’s nothing wrong you must see the result as below

The source code download:
http://sharecash.org/download.php?file=464686

Monday, November 9, 2009

Using WindowBuilder for Google Web Toolkit & GWT-EXT - Web application tutorial

Google Web Toolkit, GWT-Ext and Java Servlets used in one web application. This tutorial will take you through the steps of developing a simple web application with Google Web Toolkit and J2EE Servlet Technology by using GWT Designer visual’s tool. The application will have a servlet on server side and one web page.

Prerequisites

  • Better to be familiar with developing web applications with J2EE/Servlets Basic
  • knowledge on using Eclipse IDE

System Requirements

  • Java EE 5 is installed
  • GWT 1.7 is installed
  • GWT Designer 7.1 plug-in for eclipse is installed

In brief, GWT is a framework for developing Ajax based web pages with Java. All the HTML page content will be written as Java classes and converted into a set of JavaScript files.

GWT-Ext is a powerful widget library that provides rich widgets like Grid with sort, paging and filtering, Tree's with Drag & Drop support, highly customizable Combo Boxes, Tab Panels, Menus & Toolbars, Dialogs, Forms and a lot more right out of the box with a powerful and easy to use API.

GWT Designer (from Instantiations) is the kind of tool that will encourage greater adoption of GWT and reinforce Java as a viable programming model for creating Ajax applications that work in all browsers.

Introduction

In this tutorial we will create a simple web application which has one page. When a user clicks a button, web page content will be updated without refreshing or leaving the current page. But the web page will talk to a servlet deployed in web server and update the page content. The communication between web server and browser will be invisible to the user, providing a convenient web experience. Even though this is a simple application, it represents a main concept of any advanced application implemented with GWT.

Implementation

The development work is broken down into 5 steps:

1. Setting up GWT java project

To start with, we need to create a GWT java project, choose File>New>Project. Under categories select GWT Java Project and click next.

In Project name, enter MyGwtApp and click Next.

Select Create GWT module and leave module name and package name as default or you can enter the other name you like and click finish.

Once project is created, the project’s structure, GWT module and Entry point class is generated for you all, you don’t need to do anything else and it’s ready for you to deploy and test at once. You will see the project’s tree structure as below:


2. Adding GWT-Ext library to the project

To get it done, right click on entry point class, choose Google Web Toolkit>Configure for using GWT-Ext.

3. Creating service

For our application we need a service that provides data for our client side page. So we'll define this service to have only one method returning a String. This service will be provided through a servlet which is running on a server side.

To use a service in GWT project, we have to create the following java classes:

a.) Service definition interface
A service definition interface acts as a contract between the client and the server. It defines the functionality that is to be provided by the service, and lays down the ground rules for clients wanting to consume the functionality provided by this service.

b.) Asynchronous service definition interface
This interface is used to define the asynchronous version of the service. That is when ever a call is made to this interface, the caller can expect the service to be asynchronous and the result will be available after sometime.

c.) Service implementation
This is a class where we will implement the methods we defined in service definition interface. It’s the service servlet which does the actual work on server side.

Creating a service is very simple by using GWT Designer tool. Right click on project’s root, then choose Google Web Toolkit>GWT remote service. Browse for package and enter a name and click finish.


Now you can define a method to return a string as below:


package com.mycompany.project.client;

import com.google.gwt.core.client.GWT;
import com.google.gwt.user.client.rpc.RemoteService;
import com.google.gwt.user.client.rpc.RemoteServiceRelativePath;

@RemoteServiceRelativePath("HelloWorldService")
public interface HelloWorldService extends RemoteService {
/**
* Utility class for simplifying access to the instance of async service.
*/
public static class Util {
private static HelloWorldServiceAsync instance;
public static HelloWorldServiceAsync getInstance(){
if (instance == null) {
instance = GWT.create(HelloWorldService.class);
}
return instance;
}
}
public String getHelloWorld();
}

And then implement the method to return whatever string value you want on server side:

package com.mycompany.project.server;

import com.mycompany.project.client.HelloWorldService;
import com.google.gwt.user.server.rpc.RemoteServiceServlet;

public class HelloWorldServiceImpl extends RemoteServiceServlet implements
HelloWorldService {
public String getHelloWorld() {
// TODO Auto-generated method stub
return "Hello World!";
}
}

4. Creating a window

Now we will create a window to display data string returning from server by clicking on the button

To create a window, right click on package com.mycompany.project.client, then choose New>Other. Under categories, select GWT-Ext Window and click next.

In Name, enter HelloWorld and click finish.

You can now add a button to window by writing code or using design mode

Add OnClick event of the button and write the code to call the service we just defined above:

package com.mycompany.project.client;

import com.google.gwt.user.client.rpc.AsyncCallback;
import com.gwtext.client.widgets.Window;
import com.gwtext.client.widgets.Button;
import com.gwtext.client.widgets.event.ButtonListenerAdapter;
import com.gwtext.client.core.EventObject;

public class HelloWorld extends Window {

public HelloWorld() {
super("New window");
setSize("350px", "200px");
{
Button btnClckMe = new Button("Clck Me");
btnClckMe.addListener(new ButtonListenerAdapter() {
@Override
public void onClick(Button button, EventObject e) {
AsyncCallback callback = new AsyncCallback(){
public void onSuccess(Object result){
com.google.gwt.user.client.Window.alert(result.toString());
}
public void onFailure(Throwable caught){

}
};
HelloWorldService.Util.getInstance().getHelloWorld(callback);
}
});
add(btnClckMe);
}
}
}

Finally we need to modify entry point class in order to create instance of the window on module load.

package com.mycompany.project.client;

import com.google.gwt.core.client.EntryPoint;
import com.google.gwt.event.dom.client.ClickEvent;
import com.google.gwt.event.dom.client.ClickHandler;
import com.google.gwt.user.client.Window;
import com.google.gwt.user.client.ui.Button;
import com.google.gwt.user.client.ui.RootPanel;

/**
* Entry point classes define onModuleLoad().
*/
public class ImageViewer implements EntryPoint {
private Button clickMeButton;
private HelloWorld window;
public void onModuleLoad() {
RootPanel rootPanel = RootPanel.get();
window = new HelloWorld();
clickMeButton = new Button();
rootPanel.add(clickMeButton);
clickMeButton.setText("Click me!");
clickMeButton.addClickHandler(new ClickHandler(){
public void onClick(ClickEvent event) {
window.show();
}
});
}
}

5. Compile and deploy

We have created all the required classes and files. Now we must compile and deploy the project. The project compiling is required to generate java classes to JavaScript.

To compile the project, right click on Entry point class, then choose Run As>Compile GWT Application.

To deploy the project, right click on Entry point class, then choose Google Web Toolkit>Deploy mode. On deployment screen, browse for server path to copy WAR file and click ok.


That’s it, we can now startup the web server (for this we use apache tomcat) and get our simple application running on the browser by the following link:

http:/localhost:8089/ImageViewer


Sunday, November 1, 2009

Using MyEclipse for Hibernate projects

MyEclipse is a plugin provided by Genuitec. I use it for development of all kinds of Web applications including Hibernate, EJB2 and EJB3. MyEclipse is very up-to-date with the support of current versions of web frameworks, EJB and of course Hibernate.

Prerequisites

  • Better to be familiar with developing web applications with J2EE
  • Knowledge on using Eclipse IDE
System Requirements

  • JDK is installed
  • MyEclipse plugin is installed
  • Oracle or other database can be used
Implementation

The development work is broken down into 2 steps:

1. Adding libraries and Hibernate capabilities

Create a webproject first and open the context menu of the project (click with right mouse button on the project in the package view). Select add Hibernate capabilities.


The wizard let you select the Hibernate version and add the needed libraries to your project.

I recommend to add the libraries to the build path and not to copy them to the lib folder of the application.

This will allow to setup different configurations for deployment during development and staging.

To stage your finished application you should pack all the libraries with your project. You can configure in the project properties to deploy user libraries like the MyEclipse library in your application server.

During development, I prefer to copy all the Hibernate and struts libraries to the shared library directory of the application server. I configure the MyEclipse configuration in the project properties to not deploy any user libraries. This makes redeployment very fast.

Let’s continue with the wizard. You can select an existing Hibernate configuration file hibernate,cfg,xml or you can create a new one.

Then you can select a database connection profile for a JDBC connection or select a JNDI datasource. A connection profile is the complete configuration of a JDBC database with connection string, user name, password and DB driver.

A connection profile can be used for the database browser as well to see tables, triggers, columns. The database browser allows generating Hibernate mappings from existing tables.

Finally you can create a session factory. I prefer to use my own session factory as it is simpler but the MyEclipse session factory works perfectly as well.

2. Generate Hibernate mappings from existing db

Open the View DB Browser (MyEclipse). If you cannot find it open the “Show View” Dialog and select in the MyEclipse Enterprise Workbench the DB Browser.

Open the connection profile you specified before.

Select the tables we have just created. Right click and choose Create Hibernate Mapping.

Follow the wizard to select where to create the mapping files and classes. You can even generate DAOs.

Friday, October 9, 2009

Integrate Crystal Report with J2SE Swing application

The Java Reporting Component (JRC) in Crystal Reports XI Release 2 supports the ability to deploy applications in web and desktop environments. The JRC also includes APIs for server-side exporting and printing of reports, as well as for accessing information about a loaded report such as parameters and database information.

It is possible to deploy the JRC in one of two ways:

1. Embedding the JRC into a desktop Java application. This method requires deployment of the JRC runtimes and thick-client Swing viewer libraries in a desktop application, which is installed on client computers.
2. Embedding the JRC into a J2EE web application. This method involves the deployment of the

JRC runtimes with the zero-client DHTML Viewer in a web application archive (WAR) file.

The JRC is a 100% pure Java reporting engine that allows developers to embed reporting functionality directly into desktop and web applications. The JRC is best suited for delivering simple on demand reports to small departments or workgroups. For serving reports to larger user bases over the web with security, and scalability and fault tolerance, the Crystal Reports Server or BusinessObjects Enterprise Java SDK is recommended.

Here is a sample project:


You just open the project code by Eclipse IDE, compile with java 1.4 or 1.5 , run it and then you will see window appeared as image above.

Project Code:
http://www.fileserve.com/file/g9cggyM

I recommend reading this documentation for more understand how to set it up:
http://rapidshare.com/files/291055756/Crystal_Reports_XI_Release_2.pdf.html

Thursday, October 8, 2009

Sample project using GWT/GWT-Ext/Spring/Hibernate/ORACLE - CRUD

In May of 2006, Google released the Google Web Toolkit (GWT), a set of development tools, programming utilities, and widgets, allowing you to create rich Internet applications differently than you might have done before. The difference between GWT and all of those other frameworks, is that with GWT you write your browser-side code in Java instead of JavaScript. For those of us that rely on Java as a trusted tool this is really a monumental difference over traditional JavaScript coding. It means that besides gaining all of the advantages of Java as a programming language, you also get immediate access to a gazillion Java development tools that are already available. Instead of trying to build a new tool to support the development of rich Internet applications in JavaScript, Google has altered the language that we use to write these applications to Java, allowing us to use the tools that already exist.

GWT provides a set of ready-to-use user interface widgets that you can immediately utilize to create new applications. It also provides a simple way to create innovative widgets by combining the existing ones. You can use the Eclipse IDE to create, debug, and unit-test your AJAX applications. You can build RPC services to provide certain functionalities that can be accessed asynchronously from your web applications easily using the GWT RPC framework. GWT enables you to integrate easily with servers written in other languages, so you can quickly enhance your applications to provide a much better user experience by utilizing the AJAX framework.

Following is a short summary of these features:

  • Full Java 5 language support (such as generics, enumerated types, annotations, etc.).
  • A Java-to-JavaScript compiler with hosted mode emulation, allowing full support for Java
    debugging.
  • Browser independence—quirks and history management issues are dramatically reduced.
  • Basic widget support for buttons; forms; elements; simple tables; and tree widgets, dialogs, and panels.
  • Support for a range of server integration and communication options (RPC, XML, or
    JSON).
  • JUnit testing support and integration.
  • Internationalization language and locale support.

Here is an example project i have created by implementing together the new technologies: GWT 1.7, GWT-ext 2.0.6, Spring 2.5, Hibernate 3, JSON and Oracle database 10g express edition.

This project includes a CRUD operations related to the basic product data, i provide as well an operation for uploading photo or binary data. I believe this sample project could give some insights for java developers who is getting start using this kind of technology.

I use WindowBuilder Pro IDE 7.1 plugin for eclipse 3.4, it's a powerful and helpful editor, but it is not an open source like Netbeans IDE.

I've actually accomplished a website for Central Sign CO.,LTD. with these technologies for some part of it.

Download:

http://sharecash.org/download.php?file=442539

Auto mouse click by Java Robot

Java.awt.Robot class is used to take the control of mouse and keyboard. Once you get the control, you can do any type of operation related to mouse and keyboard through your java code. This class is used generally for test automation.

This sample program show the use of Robot class to handle mouse right click. If you run this code you will see the right click menu popup automatically for each two seconds.

i have written this program for my friend request to use in some PC game (RPG) playing, instead of using hands clicking on mouse but you let this program do it for you.

If you are Java developer, you can modify this program to fit your needs by using Netbeans 6.7 IDE and Java 5.

Download:
http://rapidshare.com/files/290546490/AutoMouseClick.rar.html